This is part two in a series of tutorials on procedural generation with Rust.
- Procedural level generation with Rust
- Drawing tile maps with Rust and Cairo (this one)
- Procedural generation using binary space partitioning
- Use prebuilt rooms with Rust macros for more interesting dungeons
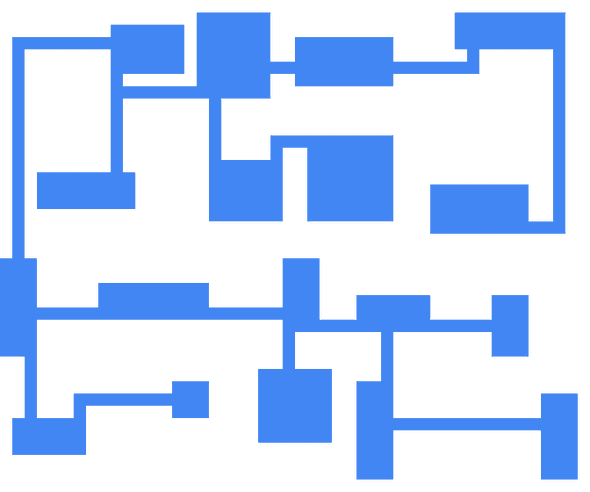
In this tutorial, we'll be using Rust to create images of levels, following on from the last post. We'll use the levels generated by the code written in the last tutorial and draw them using a graphics library, to create lovely images like this:
Setup
Other than Rust, you'll need to install Cairo, which is a drawing library, and have a copy of the code from the last tutorial.
Add Cairo
Once you have Cairo installed on your machine, we need to add the crate to our project so we can interact with it. We're going to use particular features of the cairo-rs crate, namely the png functionality, which isn't included by default. This means we need to use slightly different syntax in Cargo.toml to let Cargo know that it needs to install the PNG parts as well as the base Cairo crate - this is covered in the docs here.
# Cargo.toml
[package]
name = "dungeon-example"
version = "0.1.0"
authors = ["James Tease <james@jamestease.co.uk>"]

[dependencies]
arrayref = "0.3.4"
clap = "2.32.0"
rand = "0.5"
sha2 = "0.7.1"
serde = "1.0.68"
serde_derive = "1.0.68"
serde_json = "1.0.22"

[dependencies.cairo-rs]
features = ["png"]
version = "0.3"
The cairo-rs crate isn't in the standard list of dependencies; instead, it has its' own sub-entry under [dependencies.cario-rs]. Note: there are a couple of different ways to list optional features you want from a crate in Cargo.toml; for instance
[dependencies]
cairo-rs = { version = "0.3", features = ["png"] }

or

[dependencies.cario-rs]
features = ["png"]
version = "0.3"
are both equivalent, I just prefer the explicit dependency feature list.
Write some code
Finally, we can write some code! Update level.rs so we can read the data from the struct, and add a new field called tile_size:
// level.rs
...

#[derive(Serialize)]
pub struct Level {
    pub width: i32,
    pub height: i32,
    pub board: Vec<Vec<Tile>>,
    pub tile_size: i32,
    rooms: Vec<Room>,
    hash: String
}

impl Level {
    pub fn new(width: i32, height: i32, hash: &String) -> Self {
        let mut board = Vec::new();
        for _ in 0..height {
            let row = vec![Tile::Empty; width as usize];
            board.push(row);
        }

        Level {
            width,
            height,
            board,
            tile_size: 16,
            rooms: Vec::new(),
            hash: hash.clone()
        }
    }
    ...
}
Create a new file called draw.rs and plonk a load of code in it:
// draw.rs
extern crate cairo;

use level::{ Level, Tile };
use std::fs::File;
use self::cairo::{ Context, Format, ImageSurface };

fn draw_tile(context: &Context, x: f64, y: f64, x2: f64, y2: f64) {
    context.set_source_rgb(0.258, 0.525, 0.956);
    context.new_path();
    context.move_to(x, y);
    context.line_to(x2, y);
    context.line_to(x, y2);
    context.move_to(x2, y2);
    context.line_to(x2, y);
    context.line_to(x, y2);
    context.close_path();
    context.fill();
}

fn draw_tiles(context: &Context, board: &Vec<Vec<Tile>>, scale: f64) {
    let mut row = 0;
    for line in board {
        for (col, tile) in line.iter().enumerate() {
            match tile {
                Tile::Walkable => draw_tile(context, col as f64 * scale, row as f64 * scale, col as f64 * scale + scale, row as f64 * scale + scale),
                _ => ()
            }

        }
        row = row + 1;
    }
}

pub fn draw(level: &Level, path: &str, img_name: &str) -> Result<(), ::std::io::Error> {
    let default_output = format!("{}/{}.png", path, img_name);
    let surface = ImageSurface::create(Format::ARgb32, level.width * level.tile_size, level.height * level.tile_size).unwrap();
    let ctx = Context::new(&surface);

    draw_tiles(&ctx, &level.board, level.tile_size as f64);
    let mut file = File::create(default_output)?;
    surface.write_to_png(&mut file).unwrap();

    Ok(())
}
draw_tile is just creating a square - we set the colour as normalised RGB (ie the red, green and blue are between 0.0 and 1.0), then draw lines between the points of the square and fill it.
draw_tiles takes the board from our level, which is a vector of tile vectors. We then loop through every tile in the board, and if it's a Walkable tile then we draw it, adjusting the current co-ordinates to match the tile size set in the level.
Finally, draw is the function used in our main function, and just creates a file, sets up Cairo for drawing, and calls draw_tiles.
To actually draw the level, update main.rs to call the drawing function:
// main.rs

...
mod draw;

use draw::{ draw };

fn main() {
    ...

    let mut level = Level::new(48, 40, &seed);
    level.place_rooms(&mut rng);
    level.place_corridors(&mut rng);

    draw(&level, ".", "level").unwrap();

    ...
}
This just declares the draw module and imports the draw function, then we pass the level and path for the output file. Run with cargo run - once the cairo-rs crate has been downloaded, you should see the standard output and a new png file will be created:
You can alter the colours by changing context.set_source_rgb in draw_tile.
This is a pretty basic draw function which I mainly use for debugging, but this is the principle game frameworks use to draw tilemaps. If you change the type of tile used for corridors, you could then update the draw function to use different colours, or use an image instead of drawing rectangles.
Make animated maps
Creating animations of the creation process is pretty straightforward with the draw function and ffmpeg: you simply add a draw call in the place_rooms and place_corridors functions in Level, then use ffmpeg to merge them together.
In my case, I saved the images in an img/ folder, with all the files named as sequential numbers (ie img/01.png ... img/17.png).
You'll need to install ffmpeg, and run the following:
ffmpeg -framerate 10 -i img/%02d.png -pix_fmt yuv420p output.mp4-pix_fmt yuv420p is for Quicktime compatibility, if you'd like it to work on OSX, and img/%02d.png tells ffmpeg to read files in the img folder using two numbers in the filename. This is pretty dependent on the level generated, since each can have different numbers of rooms and corridors, so I'll leave this to you to implement.
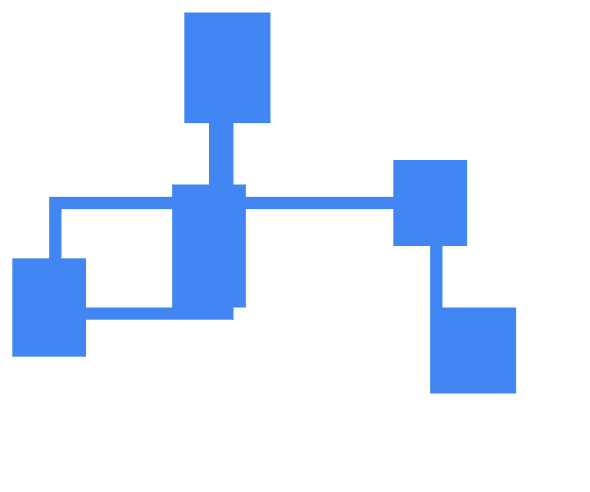
Binary space partition levels
In the next post, I'll cover using binary space partitions to create levels - this creates levels where rooms are more spread out across the board, like this: